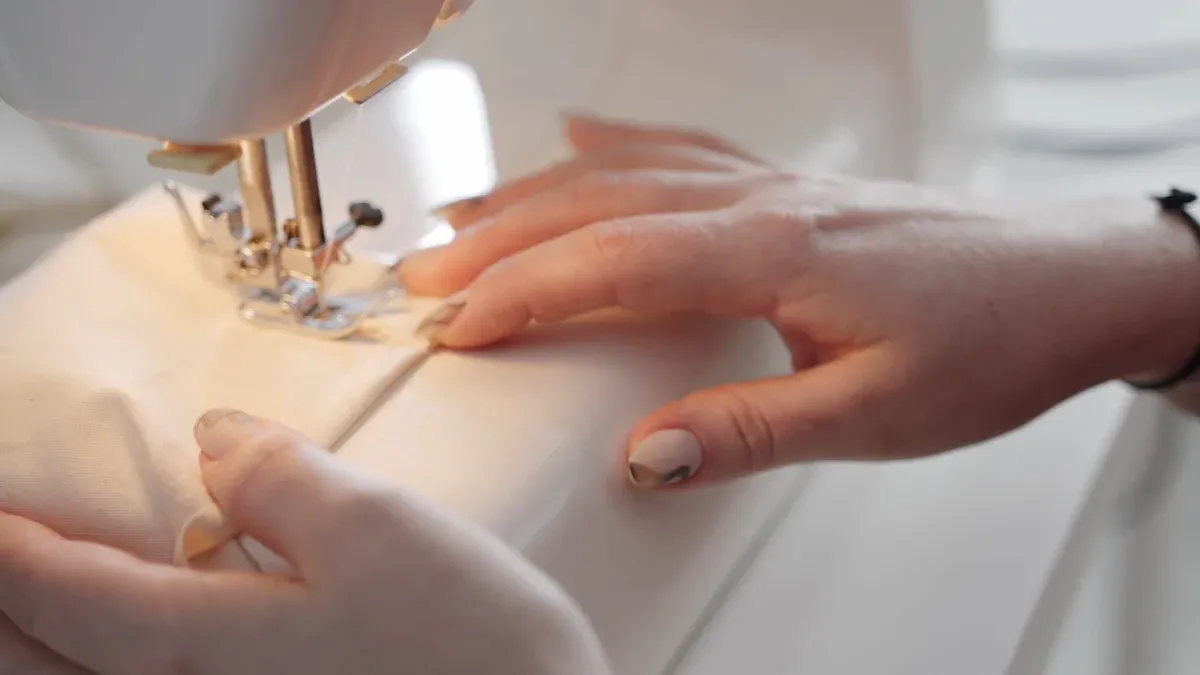
Selecting the right needle and stitch for COTTON POLY INTERLOCK ensures smooth sewing and prevents skipped stitches or puckering. Many sewists encounter issues such as stretching, wavy seams, and thread breakage due to the fabric’s unique stretch. Careful preparation, the correct tools, and gentle handling help maintain fabric integrity and produce clean results. Small adjustments, like using a ballpoint needle or adjusting tension, often make a significant difference.
Key Takeaways
- Cotton poly interlock is a stable, double-knit fabric with moderate stretch and flat edges, ideal for comfortable, durable garments.
- Always prewash and dry the fabric carefully to prevent shrinkage and maintain the garment’s fit and shape.
- Use ballpoint needles and polyester thread to avoid skipped stitches, puckering, and thread breakage.
- Choose stretch-friendly stitches like lightning bolt, triple stitch, or zigzag to keep seams flexible and strong.
- Cut fabric with sharp tools on a flat surface, securing layers with clips or pins to prevent shifting and distortion.
- Stabilize seams and edges with appropriate stabilizers when sewing high-stress areas to maintain shape and durability.
- Use a walking foot and gentle handling to feed fabric evenly and avoid wavy seams or stretching during sewing.
- Finish hems with coverstitch, twin needle, or zigzag stitches to keep edges neat and stretchy for a professional look.
Understanding COTTON POLY INTERLOCK Fabric
Key Characteristics of COTTON POLY INTERLOCK
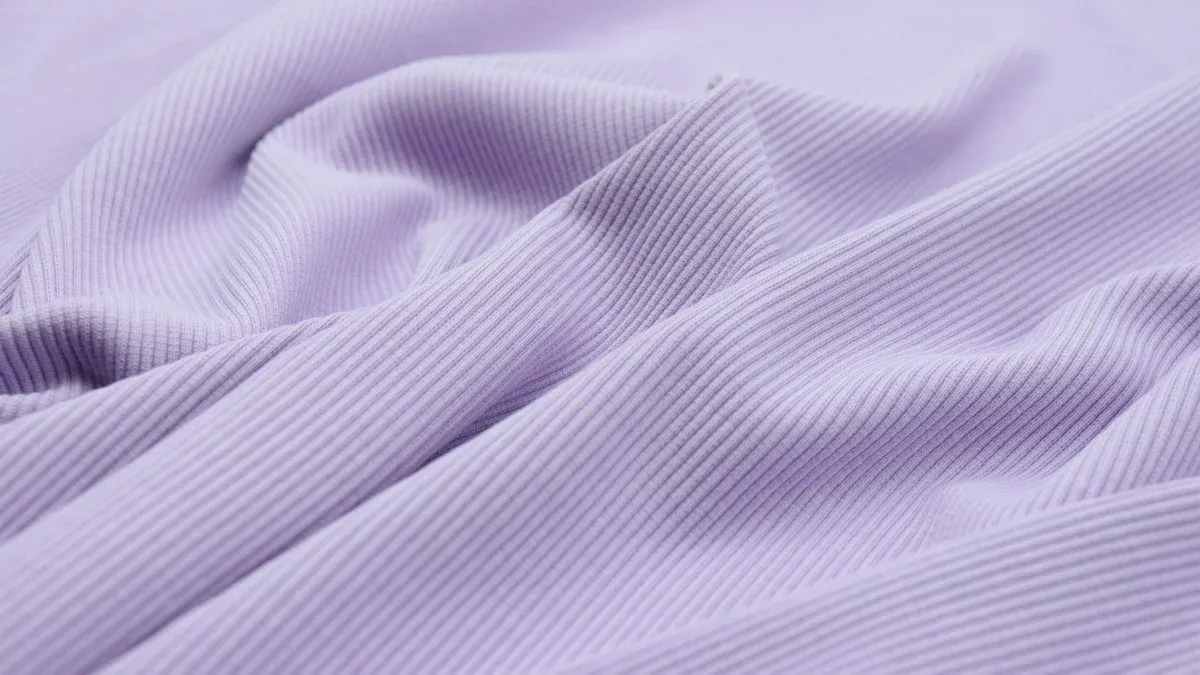
COTTON POLY INTERLOCK stands out as a double-knit fabric, produced on circular knitting machines. This structure creates a smooth, stable textile with a soft hand and a gentle drape. The fabric typically blends cotton and polyester fibers, with a common ratio being 35% cotton and 65% polyester. Some variations may include other fibers such as wool, bamboo, rayon, or silk, but the cotton-polyester blend remains the most popular for apparel.
The weight of interlock fabric ranges from 150 to 450gsm, making it heavier than many other knit fabrics. A medium-weight example, at 270gsm, offers durability and comfort, suitable for t-shirts, activewear, and children’s clothing. The double-knit construction provides excellent stretch and recovery, allowing garments to move with the body while maintaining their shape. The fabric’s edges remain flat when cut, which simplifies handling and reduces the risk of curling during sewing.
Tip: Interlock’s smooth surface and balanced stretch make it ideal for both casual and performance wear.
Why COTTON POLY INTERLOCK Needs Special Handling
Sewists often choose COTTON POLY INTERLOCK for its comfort and versatility, but its unique structure requires careful attention during sewing. The moderate 2-way stretch, primarily across the width, ensures ease of movement and a comfortable fit. Unlike jersey knit, which stretches more and tends to curl at the edges, interlock maintains a flat, stable edge. This stability helps prevent distortion but also means the fabric can resist feeding smoothly through a sewing machine if not handled properly.
The following table compares the stretch and recovery of interlock with other common knit fabrics:
| Fabric Type | Stretch Type | Stretch Amount | Recovery/Shape Retention | Notes on Edges/Texture |
|---|---|---|---|---|
| Cotton Poly Interlock | 2-way | Moderate stretch | Good recovery, returns to shape | Edges stay flat, do not curl |
| Rib Knit | 2-way | More stretchy | Good elasticity | Textured vertical ribs, very stretchy |
| Jersey Knit | 2-way | Stretchier than interlock | Less recovery, edges curl | Single knit, edges curl when cut |
| ITY | 4-way | Very stretchy | Good recovery | Soft, slinky knit |
| Sweatshirt Fleece | Minimal | Minimal stretch | N/A | Thicker, warmer, less stretchy |
The double-knit nature of interlock fabric gives it a denser feel and greater resilience. However, this same density can lead to skipped stitches or puckering if the wrong needle or stitch type is used. Proper preparation and the right tools ensure smooth seams and a professional finish. Handling the fabric gently and testing stitch settings on scraps can help avoid common issues and make the sewing process more enjoyable.
Prepping COTTON POLY INTERLOCK Before Sewing
Importance of Prewashing
Prewashing fabric remains a crucial step before starting any sewing project. This process removes manufacturing residues and allows the fabric to shrink before cutting and stitching. Cotton-poly blends, such as COTTON POLY INTERLOCK, tend to shrink less than pure cotton, but some dimensional change still occurs. Prewashing ensures that finished garments retain their intended fit and shape after laundering. Skipping this step can lead to seams puckering or garments becoming too tight after the first wash. The following table shows typical shrinkage rates for different cotton-poly blends and pure cotton interlock fabrics:
| Fabric Type / Blend | Shrinkage Length (%) | Shrinkage Width (%) | Finish Condition |
|---|---|---|---|
| 100% Cotton Knit Interlock (Un-sanforized) | ~4.5 | ~3.2 | Un-sanforized |
| Cotton-Poly 80/20 Blend | ~3.2 | ~2.4 | Un-sanforized |
| Cotton-Poly 65/35 Blend | ~2.6 | ~1.9 | Un-sanforized |
| Cotton-Poly 50/50 Blend | ~2.0 | ~1.5 | Un-sanforized |
| 100% Cotton (Sanforized) | 1.0–1.5 | N/A | Sanforized |
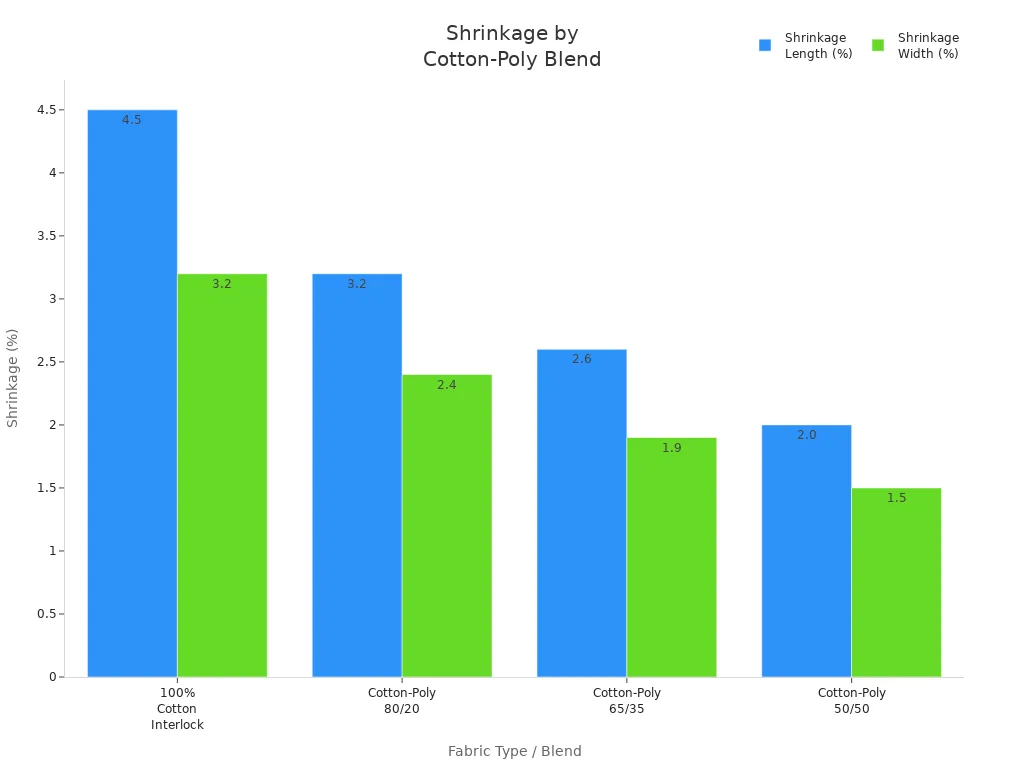
Note: Higher polyester content reduces shrinkage. Sanforized fabrics show the least change.
How to Prewash and Dry COTTON POLY INTERLOCK
Proper prewashing techniques help maintain fabric quality and prevent unwanted surprises during garment construction. For cotton-based knit fabrics, experts recommend washing the fabric inside out using cold water. This method protects the fibers and minimizes color fading. Tumble drying on a low setting further reduces the risk of excessive shrinkage or heat damage. Avoid using high temperatures, as they can distort the knit structure and affect the fabric’s stretch and recovery. After drying, smooth the fabric by hand and lay it flat to prevent wrinkles or stretching.
Tip: Always prewash fabric in the same way you plan to care for the finished garment. Consistency ensures reliable results.
Pressing and Smoothing Techniques
Pressing plays a vital role in preparing COTTON POLY INTERLOCK for sewing. Use the correct iron temperature for the fabric blend to avoid scorching or melting. Medium to firm pressure works best for setting seams and removing wrinkles. A pressing cloth provides extra protection from direct heat, especially when working with lighter colors or delicate finishes. Press seams immediately after sewing to set stitches and achieve crisp, professional-looking results. Always test the iron on a fabric scrap before pressing the main pieces.
| Decoration Technique | Temperature (°F) | Time (seconds) | Pressure |
|---|---|---|---|
| Siser HTV | 280 | 10-15 | Medium/Firm |
| Plastisol Heat Transfer | 365 | 4-6 | Medium/Firm |
| Express Iron-On | 300 | 15 | Firm |
| Holographic Iron-On | 330 | 30 | Light |
| Sublimation | 390 | 35-45 | Firm |
| Cricut Infusible Ink | 385 | 40 | Firm |
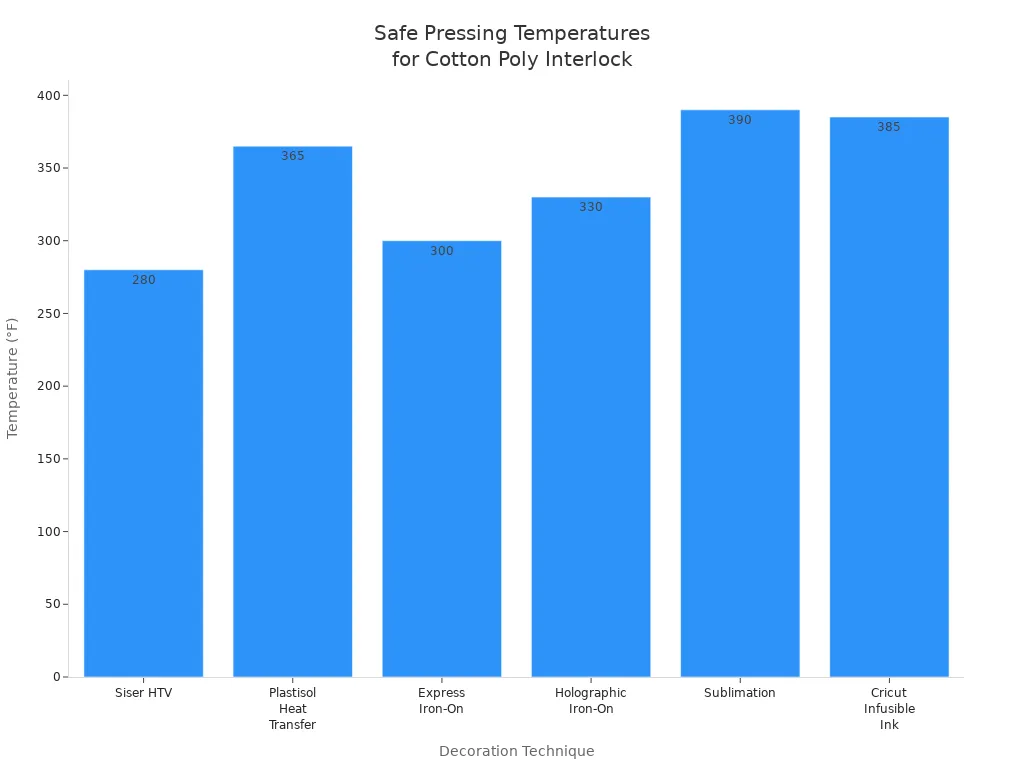
Pro Tip: Always use a pressing cloth and test on scraps to ensure the best finish and avoid damage.
Choosing Needles and Thread for COTTON POLY INTERLOCK
Best Needle Types for COTTON POLY INTERLOCK
Selecting the correct needle type is essential for smooth sewing and strong seams. Experts recommend ballpoint needles for COTTON POLY INTERLOCK and other knit fabrics. The rounded tip of a ballpoint needle glides between the fabric fibers, preventing snags and runs. Universal needles, while versatile, do not offer the same protection against fabric damage as ballpoint needles. For lightweight interlock, needle sizes 70/10 and 75/11 work well. Medium to heavier weights may require an 80/12 needle. Using the right size helps avoid skipped stitches and puckering.
- Ballpoint needles prevent laddering and fabric runs.
- Universal needles are suitable but less ideal for interlock.
- Needle sizes 70/10, 75/11, and 80/12 are most commonly used for lightweight to medium-weight interlock.
Tip: Always start with a new needle for each project to ensure clean, even stitches.
Selecting the Right Thread
Thread choice affects seam strength and flexibility. Polyester thread is the top choice for sewing COTTON POLY INTERLOCK. It stretches with the fabric and resists breaking under stress. Cotton thread lacks the necessary elasticity for knits and may snap during wear. Hybrid threads, which have a polyester core wrapped in cotton, offer both strength and a natural look. For most garments and light knits, a thread weight of 40 wt paired with a 90/14 needle provides a good balance of durability and flexibility. Matching the thread type to the fabric blend ensures long-lasting, flexible seams.
- Polyester thread offers stretch and durability for knit fabrics.
- Cotton thread is not recommended for stretch fabrics.
- Hybrid threads combine strength and a soft appearance, making them suitable for blended fabrics.
Note: Always match thread color and type to the fabric for a seamless finish.
Troubleshooting Needle and Thread Issues
Sewists may encounter several common issues when working with COTTON POLY INTERLOCK. The table below outlines frequent problems, their causes, and practical solutions:
| Issue | Causes | Solutions |
|---|---|---|
| Fraying | Dull scissors, cutting against grain, unfinished edges | Use sharp scissors, cut along the grain, finish edges with zigzag or bias tape, apply fray check |
| Puckering | Tight thread tension, wrong needle size, sewing too fast | Adjust tension, use a smaller needle, sew at a steady pace, check presser foot pressure |
| Skipped Stitches | Wrong needle type/size, dull needle, incorrect threading, thick fabric | Use ballpoint needle, replace dull needle, re-thread machine, use walking foot for thick layers |
| Needle Breaking | Sewing over pins, thick fabric, bent needle, improper insertion | Remove pins, use correct needle size, replace damaged needle, insert needle properly |
| Fabric Slipping | Incorrect presser foot | Use a walking foot to feed fabric evenly |
| Thread Breakage | Incorrect threading, sharp edges, high tension | Re-thread machine, check for burrs, reduce tension, use high-quality thread |
Pro Tip: Test needle and thread combinations on a fabric scrap before starting your main project. This step helps identify and resolve issues early.
Stitch Settings for COTTON POLY INTERLOCK
Recommended Stitches for Stretch Fabrics
Selecting the right stitch type is crucial when sewing stretch fabrics like COTTON POLY INTERLOCK. This double-knit fabric offers stability and moderate stretch, making it suitable for a range of garments from athletic wear to casual clothing. To maintain the fabric’s elasticity and prevent seam breakage, sewists should use stitches designed for stretch fabrics.
Popular options include:
- Lightning Bolt Stitch: This stretch stitch, available on many modern machines, provides flexibility and a neat appearance. It stretches with the fabric but may not withstand heavy stress as well as other stitches.
- Triple Stitch (Stretch Straight Stitch): This stitch moves forward and backward, locking the seam for maximum strength and stretch. It works well for heavy-weight knits and activewear.
- Zig-Zag Stitch: For machines without specialized stretch stitches, the zig-zag stitch remains a reliable choice. Adjusting the width and length allows the seam to stretch with the fabric, reducing the risk of popped stitches.
Tip: Avoid overstretching the fabric while sewing. Let the feed dogs guide the fabric to prevent puckering or bunched seams.
Adjusting Stitch Length and Tension
Proper stitch length and tension settings help achieve balanced, durable seams on COTTON POLY INTERLOCK. For most projects, a stitch length between 2.0 and 2.5 mm works well. This range provides enough flexibility for the seam to stretch without compromising strength.
Machine tension typically falls between 4 and 5 for cotton-poly blends. This setting creates even stitches and prevents thread breakage. For particularly stretchy projects, slightly loosening the tension can accommodate the fabric’s movement. However, because interlock is a stable knit, standard tension settings usually suffice.
| Setting | Recommended Value |
|---|---|
| Stitch Length | 2.0 – 2.5 mm |
| Tension | 4 – 5 |
Always match the needle size and thread type to the fabric. A 90/14 ballpoint needle and polyester thread provide optimal results for most interlock projects.
Testing Stitches on Scrap COTTON POLY INTERLOCK
Before starting a main project, testing stitches on scrap fabric helps identify the best settings and prevents surprises. Pre-wash the scrap fabric to account for any shrinkage. Use a ballpoint or stretch needle to avoid skipped stitches. Select a suitable stitch, such as a narrow zig-zag or stretch stitch, and set the stitch length to 2.0–2.5 mm. For zig-zag stitches, a width of 0.5–1.0 mm works well.
Reduce presser foot pressure to allow the fabric to feed smoothly. A walking foot can help manage multiple layers and prevent distortion. Handle the fabric gently, letting the machine guide it. If issues like skipped stitches or puckering occur, try changing to a fresh needle or adjusting the tension. Quality polyester thread reduces the risk of thread breakage.
Note: Testing all stitch types and settings on scraps ensures professional results and minimizes frustration during the main sewing process.
Cutting COTTON POLY INTERLOCK Accurately
Essential Cutting Tools
Accurate cutting begins with the right tools. Sharp fabric scissors, reserved exclusively for textiles, deliver clean edges and prevent fraying. Rotary cutters, paired with a self-healing mat and a clear ruler, allow for precise straight and curved cuts. Many professionals prefer rotary cutters for their ability to maintain even pressure and control. Pinking shears offer another option, creating a zigzag edge that helps minimize fraying by reducing exposed threads. For additional protection, a liquid sealant such as Fray Check can be applied to cut edges, though it may slightly stiffen the fabric. When using scissors, long, smooth strokes along the grainline help avoid jagged edges and maintain fabric integrity.
Tip: Always keep cutting tools sharp and use them only for fabric to extend their lifespan.
Preventing Fabric Shifting
Cotton poly interlock’s smooth surface can cause layers to shift during cutting. Pattern weights and pins secure the fabric and pattern pieces, reducing movement. Many sewists find that cutting on a single layer provides better control, especially for slippery or stretchy knits. Rotary cutters glide smoothly and help maintain accuracy, while fabric starch sprayed on the edges and pressed with an iron stabilizes the fabric and reduces curling. Matching selvages and adjusting the fold until smooth ensures the fabric stays on-grain, which further prevents shifting. Fine ballpoint pins or fabric clips hold layers together without snagging or distorting the knit.
A stable cutting surface also plays a key role. Laying the fabric flat before cutting prevents distortion. Pattern weights, rather than pins, minimize shifting and preserve the fabric’s stretch. Tracing pattern outlines with chalk or a fabric marker offers a clear guide for cutting, especially when working with dark or textured knits.
- Use pattern weights or pins to secure fabric.
- Cut on a single layer for better control.
- Spray starch and press to stabilize edges.
- Match selvages and smooth folds to stay on-grain.
- Employ fine pins or clips to align layers.
Cutting Single vs. Double Layers
Choosing between single and double layer cutting depends on the project and fabric stability. Cutting a single layer offers maximum precision, especially for complex shapes or when matching patterns. This method allows for careful alignment and reduces the risk of shifting. Double layer cutting speeds up the process for symmetrical pieces, such as sleeves or pant legs, but requires extra care to keep both layers perfectly aligned.
When cutting double layers, use plenty of pattern weights and check that the fabric remains flat and smooth. Rotary cutters work well for both methods, providing clean, even edges. For best results, always pre-wash and press the fabric, lay it flat, and ensure all tools are sharp. These steps help achieve professional, accurate cuts every time.
Stabilizing COTTON POLY INTERLOCK Seams and Edges
When to Use Stabilizers
Stabilizers play a crucial role in reinforcing seams and edges, especially when working with knit fabrics that stretch or may experience thread breakage. Several situations call for the use of stabilizers:
- Seams that will undergo frequent stretching or stress, such as those in activewear or children’s garments.
- Projects using weaker threads, like Aurifil 50wt cotton, combined with straight stitching, which can lead to seam opening.
- Garments or quilts that mix stretch fabrics with stable backings, such as soft fleece, to prevent distortion during handling.
- Memory quilts or items expected to endure frequent washing and use, where durability is essential.
- When reinforcing seams with a narrow zigzag stitch and strong polyester thread to prevent breakage.
- Edges that require extra support, such as necklines, armholes, or hems, to maintain shape.
- During construction of quilt tops, lightweight fusible interfacing or fine muslin spray basted to the fabric can help stabilize seams and edges.
Tip: Always test stabilizer and stitch combinations on fabric scraps before starting the main project. This practice helps avoid stretching or distorting the knit.
Types of Stabilizers for COTTON POLY INTERLOCK
Choosing the right stabilizer depends on the fabric’s weight, the project’s requirements, and the desired finish. Common options include:
| Stabilizer Type | Best Use Cases | Notes |
|---|---|---|
| Fusible Tricot (Stay-Flex) | Reinforcing seams and edges in knits | Bonds well, withstands repeated washing |
| Lightweight Fusible Interfacing | Stabilizing quilt tops, hems, or collars | Adds minimal bulk, easy to apply |
| Fine Muslin (Spray Basted) | Temporary stabilization for seams and edges | Removable, gentle on delicate knits |
| Cut Away Stabilizer | Embroidery or dense stitching on knits | Prevents puckering, remains after stitching |
| Tear Away Stabilizer | Temporary support during stitching | Removes easily, does not add permanent bulk |
Fusible tricot stabilizers, such as Stay-Flex, offer superior durability compared to non-woven fusibles, which may degrade after multiple washes. Lightweight options work well for thin knits, while heavier or layered stabilizers suit thicker fabrics or dense designs.
Applying Stabilizer Effectively
Proper application of stabilizer ensures seams remain strong and fabric retains its shape. The following methods help achieve the best results:
- Use fusible cut away stabilizers for knits to prevent distortion and puckering. Fusing bonds the stabilizer to the fabric, so both layers move together during sewing or embroidery.
- Select stabilizer weight based on fabric thickness and design density. Lightweight or mesh cut away stabilizers suit thin knits, while medium or heavy options work for thicker fabrics.
- Avoid spray adhesives or basting when using fusible stabilizers, as fusing alone prevents shifting and reduces hoop marks.
- For embroidery, maintain proper hoop tension and choose compatible thread and needle types to avoid distortion.
- Tear away stabilizers can provide temporary support alongside cut away stabilizers, adding stability without permanent bulk.
- Always test stabilizer application on a scrap piece to check for puckering or distortion before working on the main project.
Note: Fusing stabilizer to the fabric ensures stability and helps prevent stretching or distortion during construction and wear.
Pinning and Clipping COTTON POLY INTERLOCK Without Distortion
Best Pins and Clips for COTTON POLY INTERLOCK
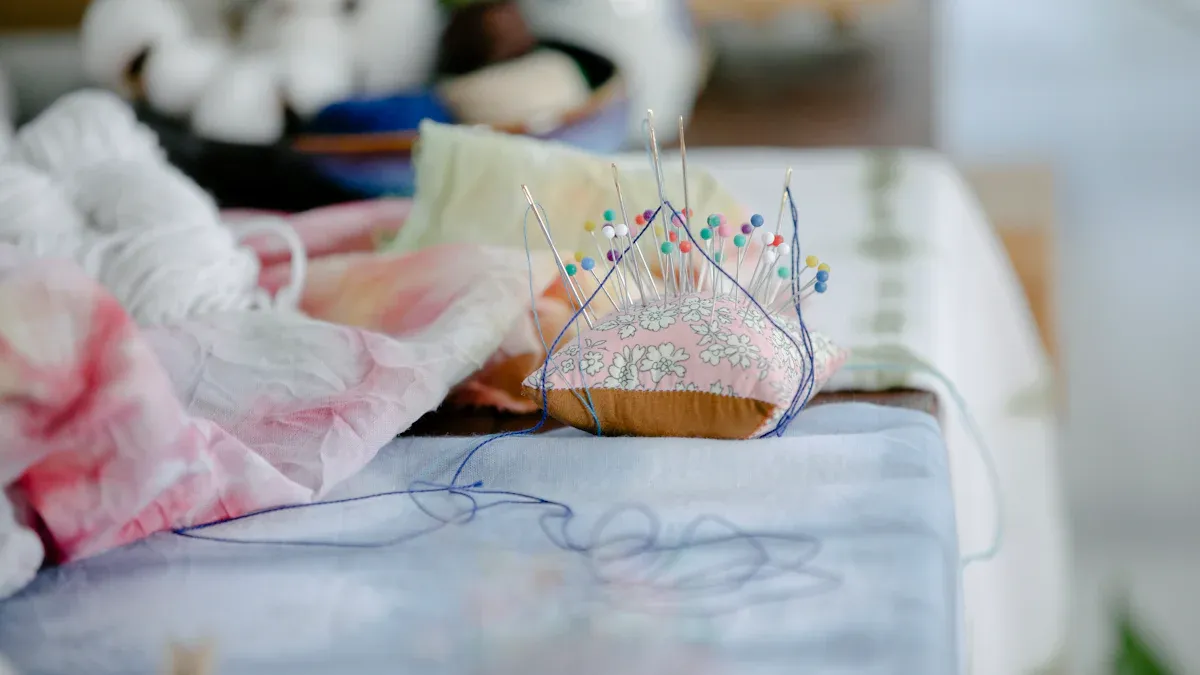
Selecting the right tools for securing fabric layers prevents damage and distortion. Many professionals recommend using clips instead of traditional pins when working with this knit. Clips, such as Clover Wonder Clips, distribute pressure evenly and keep the fabric flat. They do not snag fibers or get caught under the presser foot. Paper binder clips also serve as a practical alternative, especially for thicker seams. When pins are necessary, ballpoint pins provide the safest option. Their rounded tips glide between fibers, reducing the risk of snags or holes.
Recommended tools for securing fabric:
- Clover Wonder Clips or similar fabric clips
- Paper binder clips for thicker layers
- Ballpoint pins for minimal fabric damage
Tip: Clips work especially well for thicker knits and help maintain even pressure across seams.
Pinning Techniques to Prevent Stretching
Proper pinning techniques help maintain the fabric’s shape and prevent unwanted stretching. Placing ballpoint pins within the seam allowance avoids visible holes and keeps the fabric stable. Pattern weights offer another solution by holding fabric flat without piercing it. For added support, sewists sometimes use tissue paper or wash-away stabilizer underneath the fabric. This temporary layer helps prevent distortion during stitching.
A step-by-step approach ensures best results:
- Place ballpoint pins only within the seam allowance.
- Use pattern weights to hold fabric in place for cutting or marking.
- Insert a layer of tissue paper or wash-away stabilizer under the fabric before sewing.
- Allow the machine’s feed dogs to move the fabric naturally—avoid pulling or stretching.
- Attach a walking foot or dual feed system to ensure even feeding of both layers.
- Lower the presser foot pressure to minimize distortion.
Note: Consistent use of these techniques leads to smoother seams and a more professional finish.
Alternatives to Pinning
Several alternatives to traditional pinning can stabilize fabric without risk of distortion. Fusible interfacing bonds to the fabric with heat, providing stability and eliminating the need for pins or basting. Doubling up the main fabric or adding a layer of muslin, cotton canvas, or linen can add structure and help maintain grain alignment. Felt fabric offers additional stability, though it may change the texture. Starch sprays and gelatin solutions temporarily stiffen the fabric, making it easier to handle and sew.
Common alternatives include:
- Fusible interfacing for precise placement and stability
- Doubling fabric layers to maintain drape and grain
- Adding natural fiber layers such as muslin or linen
- Using felt for extra robustness
- Applying starch spray or gelatin solution for temporary stiffness
Testing these methods on fabric scraps ensures compatibility and prevents surprises. Pre-shrinking all stabilizing materials helps maintain the fabric’s stretch and recovery.
Pro Tip: Always test alternative methods on a small sample before applying them to the main project.
Managing Stretch While Sewing COTTON POLY INTERLOCK
Feeding Fabric Evenly
Achieving even fabric feeding is essential for professional-looking seams. Uneven feeding can cause stretching, puckering, or misaligned layers. To ensure smooth progress through the sewing machine, sewists can follow these steps:
- Attach a walking foot or use a presser foot designed for knits to help feed both layers evenly.
- Stabilize the fabric before sewing to maintain alignment and reduce distortion.
- Choose stitch types that accommodate stretch, such as a narrow zigzag or twin needle stitch.
- Adjust machine settings, including presser foot pressure and stitch length, to optimize feeding.
- Handle the fabric gently and keep it flat, avoiding unnecessary pulling.
- Test stitches on scrap fabric to confirm that settings and techniques produce even results.
Tip: Consistent testing and gentle handling help prevent common issues before they affect the final garment.
Avoiding Wavy Seams
Wavy seams often occur when the fabric stretches or shifts during sewing. The following table outlines common causes and prevention methods:
| Cause of Wavy Seams | Explanation | Prevention Method |
|---|---|---|
| Fabric stretching during sewing | Excessive presser foot pressure or pulling the fabric | Lower presser foot pressure; let feed dogs move fabric |
| Uneven feeding of fabric layers | Layers shift without a walking foot or dual feed | Use a walking foot or dual feed |
| Incorrect machine tension | High tension causes puckering and waviness | Adjust tension; try loosening top tension |
| Fabric bunching or not lying flat | Bunched fabric leads to uneven seams | Ensure fabric lies flat and smooth |
| Lack of fabric stabilization | Knit fabrics can stretch and distort | Use stabilizers like tissue paper or wash-away stabilizer |
| Post-sewing seam distortion | Seams may remain wavy after sewing | Use steam pressing (without pressing down) |
Steam pressing can help shrink seams back to shape after sewing. For best results, avoid pressing down directly on the seam; instead, hover the iron and use steam to relax the fibers.
Using a Walking Foot
A walking foot, also known as an even feed foot, offers significant advantages when sewing knit fabrics. Its design feeds both the top and bottom layers of fabric at the same rate, which helps prevent stretching and distortion. Key benefits include:
- Feeds both layers evenly, reducing the risk of stretching or puckering.
- Maintains smooth and aligned fabric feeding, which helps avoid wavy seams.
- Prevents the top layer from stretching ahead of the bottom layer, ensuring seam stability.
- Works best when combined with gentle handling and appropriate stitch choices, such as zigzag or stretch stitches.
- Allows for optimal results when machine tension and stitch settings are tested on fabric scraps.
Note: Adjusting presser foot pressure and handling the fabric gently further enhances the walking foot’s effectiveness.
Hemming COTTON POLY INTERLOCK for a Professional Finish
Hemming Options for COTTON POLY INTERLOCK
Sewists have several reliable options for hemming knit garments to achieve a polished, durable finish. The most professional results often come from specialized equipment or thoughtful technique selection. Common hemming methods include:
- Coverstitch Machine Hem: This machine creates parallel rows of stitching on the outside and a secure, stretchy finish on the inside. It delivers a ready-to-wear appearance and maintains fabric elasticity.
- Twin Needle Hem: A regular sewing machine fitted with a twin needle can mimic the look of a coverstitch. The result is two neat lines of stitching on the right side and a zigzag on the reverse, allowing the hem to stretch with the garment.
- Zigzag and 3-Step Zigzag Stitches: These stitches provide flexibility and prevent popped seams. They work well when a coverstitch or twin needle is unavailable.
- Serged or Overlock Hem: Sergers trim and finish the edge in one step, producing a clean, stretchy hem ideal for activewear and casual garments.
- Fabric Bands: Attaching a band of rib knit or matching fabric to the hem creates a smooth, professional edge without the need for stabilizers.
- Decorative Hems: Techniques like scalloped or lettuce hems add flair, though they suit lightweight knits and casual styles best.
Tip: Always use ballpoint needles and stretch threads such as wooly nylon to prevent fabric damage and ensure long-lasting stretch.
Using Twin Needles
Twin needles offer an accessible way to achieve a professional hem on knit fabrics. They create two parallel lines of stitching on the garment’s exterior, closely resembling a coverstitch finish. The underside forms a zigzag pattern, which preserves the fabric’s stretch and prevents seam breakage.
Benefits of using twin needles include:
- Producing a polished, double-stitched hem that stretches with the fabric.
- Providing a cost-effective alternative to a coverstitch machine.
- Ensuring the hem retains its shape after repeated wear and washing.
Sewists may encounter challenges such as thread breakage or puckering. Adjusting the upper thread tension and using a stretch or jersey twin needle can resolve these issues. A walking foot helps feed the fabric evenly, reducing distortion. Selecting the correct needle size and thread type further enhances results.
Note: Always test the twin needle setup on a fabric scrap to fine-tune tension and stitch length before hemming the main garment.
Stretch Hemming Techniques
Maintaining stretch in hems is essential for comfort and garment longevity. Several techniques help achieve this goal:
| Hemming Method | Stretch Retention | Appearance | Equipment Needed |
|---|---|---|---|
| Coverstitch | Excellent | Professional | Coverstitch machine |
| Twin Needle | Very Good | Double-stitched | Twin needle, sewing machine |
| Zigzag/3-Step Zigzag | Good | Subtle to visible | Standard sewing machine |
| Serged/Overlock | Excellent | Clean, neat | Serger/overlocker |
| Fabric Band | Excellent | Smooth, polished | Sewing machine/serger |
For best results, sewists should avoid straight stitches, as they lack elasticity and may cause hems to pop during wear. Using stretch threads and ballpoint needles further protects the fabric and ensures seam durability. Adjusting machine tension and stitch length, along with gentle handling, helps prevent puckering and distortion.
Pro Tip: Press hems lightly with steam after sewing to set stitches and achieve a crisp, professional look.
Finishing and Caring for COTTON POLY INTERLOCK Projects
Seam Finishes for COTTON POLY INTERLOCK
Proper seam finishing ensures garments look professional and last longer. Several methods work well for this fabric:
- Zigzag Stitch: A zigzag stitch along raw edges prevents fraying and maintains flexibility. This method suits most home sewing machines and adapts to the fabric’s stretch.
- Overcast Stitch: Many machines offer an overcast stitch, which encloses raw edges and mimics a serger’s effect. This finish works well for knit fabrics and adds durability.
- French Seams: For a clean, enclosed finish, French seams hide raw edges inside the seam. This technique works best for lighter-weight interlock and creates a polished look.
- Bias Tape Finish: Encasing raw edges with bias tape adds both strength and a decorative touch. This method works well for visible seams or unlined garments.
- Serger/Overlock Finish: Using a serger provides the most durable and flexible seam finish. The machine trims and encloses edges in one step, preventing fraying and maintaining stretch.
Tip: Always use sharp scissors and cut along the grainline for the neatest results. Applying a small amount of fray check to edges can further reduce fraying.
Using a Serger vs. Sewing Machine
Choosing between a serger and a standard sewing machine depends on the desired finish and available equipment. A serger excels at creating strong, stretchy seams and clean edges. It trims excess fabric while stitching, which saves time and produces a professional look. Sergers handle thick or layered knits with ease, making them ideal for activewear or children’s clothing.
A regular sewing machine remains versatile and accessible. It offers a range of stitches, such as zigzag, overcast, and specialty stretch stitches. With the right needle and presser foot, a sewing machine can produce durable seams suitable for most projects. For those without a serger, combining a stretch stitch with a zigzag or overcast finish provides excellent results.
| Feature | Serger | Sewing Machine |
|---|---|---|
| Seam Strength | Excellent | Good |
| Edge Finish | Professional, enclosed | Varies (zigzag, overcast) |
| Stretch Retention | High | Moderate to high |
| Versatility | Limited to knits/edges | Broad range of stitches |
| Ease of Use | Requires setup/learning | Familiar to most users |
Note: Both machines can produce quality results. The choice depends on project needs and personal preference.
Washing, Drying, and Storing COTTON POLY INTERLOCK Garments
Proper care extends the life and appearance of finished garments. Gentle washing methods protect fibers and maintain shape. Hand washing in cool or lukewarm water with a mild detergent works best for delicate items. For machine washing, place garments in a mesh laundry bag, select a gentle cycle, and use cold water. Turning garments inside out reduces friction and preserves color.
Avoid high heat during drying. Air drying on a flat surface or using a low-heat tumble dryer helps prevent shrinkage and fiber damage. Hanging heavy knits can cause stretching, so folding is recommended. Store garments in a cool, dry place away from direct sunlight to prevent fading. Protect delicate knits from moths by using storage bags or cedar blocks.
- Wash in cold water and avoid bleach.
- Use gentle detergents and avoid fabric softeners.
- Air dry or tumble dry on low heat.
- Fold garments for storage; avoid hanging heavy items.
- Store in a cool, dry, and dark place.
Pro Tip: Following care labels and minimizing frequent washing will help garments retain their softness and shape.
Repair and Maintenance Tips
Proper repair and maintenance extend the life of any knit garment. When a seam pops or a small hole appears, immediate attention prevents further damage. Many knit fabrics respond well to simple hand or machine repairs.
Common Repair Methods:
- Hand Stitching Small Holes:Use a ballpoint hand sewing needle and polyester thread. Gently pull the edges of the hole together. Stitch with small, even whipstitches or a ladder stitch. This method works best for minor snags or tiny tears.
- Reinforcing Stretched Seams:If a seam stretches out or opens, turn the garment inside out. Align the seam edges. Sew over the original seam with a narrow zigzag stitch. This reinforces the area and restores stretch.
- Patching Larger Holes:For larger holes, cut a patch from matching fabric. Place the patch behind the hole. Secure it with a zigzag or stretch stitch. Trim excess fabric from the inside for comfort.
- Fixing Hem Issues:If a hem unravels, press the area flat. Use a twin needle or zigzag stitch to re-hem. Match the original hem width for a seamless look.
Tip: Always use matching thread and fabric for invisible repairs. Test stitches on a scrap before repairing the main garment.
Maintenance Checklist:
| Task | Frequency | Tools Needed |
|---|---|---|
| Inspect seams and hems | Monthly | Good lighting, hands |
| Remove pilling | As needed | Fabric shaver, lint roller |
| Check for loose threads | After each wash | Small scissors |
| Store folded, not hung | Always | Storage bins, shelves |
| Wash gently, air dry | Every wash | Mild detergent, drying rack |
Regular inspection helps catch problems early. Remove pills with a fabric shaver to keep garments looking new. Trim loose threads to prevent snags. Fold garments for storage to avoid stretching. Wash with care to maintain softness and shape.
Note: Prompt repairs and gentle maintenance keep knit garments comfortable and attractive for years.
Sewists who follow these top 10 tips will achieve clean, professional results with COTTON POLY INTERLOCK. Each technique, from choosing the right needle to proper hemming, supports fabric quality and garment durability. Practice and patience help build confidence and skill. Readers can share their own experiences or tips in the comments to support others in the sewing community.
FAQ
What needle works best for cotton poly interlock?
A ballpoint needle works best. Its rounded tip slides between fibers, preventing snags and skipped stitches. Sizes 75/11 or 80/12 suit most interlock fabrics.
Can a regular sewing machine handle cotton poly interlock?
Yes. A standard sewing machine can sew cotton poly interlock. Use a ballpoint needle and stretch stitch settings for best results.
How can sewists prevent wavy seams on interlock fabric?
Lower presser foot pressure and use a walking foot. Let the feed dogs move the fabric. Avoid stretching the fabric while sewing.
Should cotton poly interlock be prewashed before sewing?
Yes. Prewashing removes residues and allows for any shrinkage. This step ensures the finished garment keeps its intended size and fit.
What thread type is recommended for sewing interlock?
Polyester thread is recommended. It stretches with the fabric and resists breaking. Cotton thread lacks the necessary elasticity for knits.
How can sewists finish seams on cotton poly interlock?
A zigzag stitch, overcast stitch, or serger provides clean, durable seam finishes. These methods prevent fraying and maintain stretch.
Is stabilizer necessary for all seams?
Not always. Use stabilizer for high-stress areas, hems, or when sewing with lightweight interlock. Test on scraps to determine if extra support is needed.
How should finished garments be washed and dried?
Wash in cold water with mild detergent. Air dry flat or tumble dry on low heat. Avoid high temperatures to preserve fabric quality.
Post time: Aug-06-2025